Tiling the walls is the best way to decorate the bathroom, kitchen, or any part of the house’s wall, and even floors. Since ceramic tiles are highly durable, they are more frequently used in such cases.
But if you are renovating your home or changing pipes, removing a section or all of it becomes an essential task. And if you know how to cut ceramic wall tile that is already installed, it will become your next DIY project.
To cut ceramic wall tile, first, cover the doors and vents with plastic sheets and ensure the room is ventilated enough to let the tiles dust out. Then mark the tile with a grease pencil and use an angle grinder to cut the tile you want to remove. You can use a Dremel tile cutting bit to cut the tile properly and spray water occasionally.
Ceramic tiles last for years. That’s why it becomes a little challenging when it comes to cutting the tiles for some reason.
But if it is necessary, you can do it with the right tools. I am sharing step-by-step instructions in today’s article, along with a few tips to help you get the job done efficiently.
Quick Navigation
How To Cut Ceramic Wall Tile That Is Already Installed?
Removing ceramic wall tiles is not pleasing, especially if it is your first time working on such a project. On top of that, there is dust and particles involved.
However, if you take the necessary safety measures before starting, you will finish the job more efficiently. Talking about efficiency, here is an easy guide for you on how to remove pre-installed ceramic tiles.
Things You Will Need
- Safety glass
- Dust mask
- Gloves
- Plastic sheet
- Masking tape
- Grease pencil
- Masking tape
- Angle grinder
- Dremel tile cutting bit
- Vacuum machine
- Wet Mop
Step 1: Clear Out The Area
Your first job is to remove any unnecessary item from that room. However you do it, cutting tiles will create lots of dust. So it is best to clear out the area and ensure nothing will interrupt the work.
You need to cover the doors and vents with plastic sheets to prevent the dust from reaching further into the house. Use masking tape to secure the plastic sheets into their place.
Step 2: Keep Windows Open
Though you need to seal the doors and vents with plastic sheets to prevent the dust from getting in, you also need to ensure proper ventilation to let the dust out. The area you will work in should be well ventilated.
You can keep the windows open to let the dust and fumes pass easily. You can keep a fan to accelerate the air and help the dusty air pass through the window.
Step 3: Mark The Cutting Area
Marking the area on the tile will help you cut more efficiently and without damaging any unnecessary tiles. Using a grease pencil, you can make sure the marking is quite bold. I suggest doing so because the dust can cover the marking slightly as you cut through the tiles.
You can also use masking tape to tape the areas you don’t want to cut, running the tape along the marking lines. Besides, it will help you get a better result.
Step 4: Put On Safety Gears
You must not go for any tile cutting job without wearing safety gear. Dust and fumes created from tile cutting are not good for the respiratory system.
Besides, the flying particles or broken tile pieces can hit your eyes. And then there is the grinder you are going to deal with. So, what safety gears should you use?
You will need a pair of gloves, safety eyeglasses, and a mask. These will help ensure you do not get hurt or suffer from any issue while cutting the tile.
Step 5: Get An Assistant
Having a pair of helping hands will make this task a little easier for you. Have someone assist you, especially to spray water as you cut through the tiles. This will help reduce the amount of dust the job creates.
Besides, you need someone to vacuum the area as more dust starts to gather. So having task assistance will make the work efficient and quick.
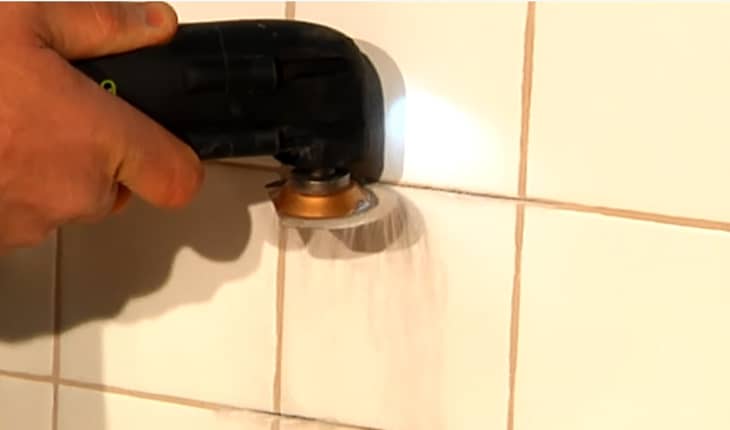
Step 6: Start Cutting Tile With The Angle Grinder
Now, it’s time to introduce the angle grinder to the tile you want to cut. But before you begin this step, squirt some water on the tile to ensure no dirt or particles are left on it. Then use the angle grinder to cut along the area you have marked on the tile.
Make sure to hold the grinder straight on the tile to cut through it. If you are cutting on a curved area, make the cuts small and straight.
Step 7: Use Dremel Bit
Once you cut the tile and reach closer to the wall surface, doing the next part will become quite challenging. At this point, you need to remove whatever is left of the tile.
Use a Dremel bit to remove those parts. It always works very effectively to remove tiles bits from the corners. Make sure to keep the electronic wires away as the water spray may create hazardous situations.
Step 8: Clean The Area
Now that you are done cutting the tile entirely, one final step remains. You will notice that the entire working area is covered with dust. So you or your assistant’s job is to clean the whole area.
You can use a vacuum machine to clean the room more quickly. Finally, take off the plastic sheets and tapes from the doors and vents.
Wipe the entire room with a wet mop. It will help clean up the dust that the vacuum could not. And remember to keep your mask on until you are done with all these works.
Precautions
Cutting ceramic tiles is not an amateur task. You at least need to know how to handle all the essential tools, especially the electric ones.
And since there are cuttings involved, it is also mandatory to take some precautions. Here are some safety tips to keep in mind while preparing and cutting ceramic tiles.
- Always wear safety gear, such as a mask, eyeglasses, and gloves.
- If you are using a drill, it is necessary to keep its temperature under control.
- The working room must have sufficient airflow, or the dust can cause suffocation.
- Start the grinder slowly and then increase the speed to avoid unexpected damage.
- Make sure children stay out of the working area.
The most important part is to stay alert all the time. No matter how much safety gear or what tools you use, there is always a chance of ending up with a slippery floor or getting wires on the way. So make sure to pay extra attention to those things.
Final Words
You can trust ceramic tiles to last forever if they are not disturbed. But it is tough to rely on your home’s plumbing system forever. That’s why knowing how to cut ceramic wall tile that is already installed comes in handy.
The best way to get everything done quicker is to have help, especially if you are not fond of handling everything alone. And also, make sure to keep all the necessary things prepared so that you can get them immediately when needed. Follow the instructions I have provided, and I believe you will have no problem cutting the already installed ceramic tile.